There is a pervasive myth in the web development community: “WordPress is for novices. Real developers build custom apps.”
If you’re a developer who loves the clean workflow of Git, the component architecture of React, or the speed of static sites, you might look at WordPress with disdain. You might picture bloated plugins, spaghetti PHP code, and ongoing security concerns.
But if you ignore WordPress, you are ignoring a tool that powers over 60% of all websites using a CMS.
That market dominance isn’t an accident, and it isn’t just because it’s “easy” for beginners. It’s because WordPress solved the hardest problem in web development: Content Management.
As technical experts, we need to stop looking at WordPress as a “website builder” and start seeing it for what it truly is: a highly accessible, open-source, API-driven Content Database.
Whether you are using a sophisticated Roots.io stack with Git integration or going fully Headless, WordPress gives you complete freedom to manipulate the frontend while empowering your non-technical team.
However, the allure of “simplifying” the stack often leads developers to swing the pendulum too far in the opposite direction. In an effort to escape database management and PHP, many technical teams migrate to pure Static Site Generators (SSGs), relying solely on Markdown files.
While this initially feels like a developer’s utopia, offering total control and zero maintenance, it often turns into an operational nightmare for the rest of the organization.
Table of Contents
- 1 Who This Architecture Is For
- 2 Why You Shouldn’t Use Static Site Generators
- 3 Classic vs. Headless WordPress
- 4 How To Set Up Headless WordPress with Gatsby
- 5 Next Steps and Considerations
- 6 Scaling and Optimization
- 7 Maintaining Security
- 8 WordPress is a Power-Up, Not a Compromise
- 9 Frequently Asked Questions
- 9.1 Is Headless WordPress too complex for a small development team?
- 9.2 Does using a Headless architecture hurt my SEO rankings?
- 9.3 Do I need to be a Linux system administrator to use RunCloud?
- 9.4 Why use RunCloud instead of traditional “Managed WordPress” hosting?
- 9.5 Will my existing WordPress plugins be compatible with a Headless setup?
- 9.6 Is WordPress secure enough to be used as an enterprise backend?
- 9.7 Why not just use a pure file-based CMS instead of WordPress?
- 9.8 Does running two separate applications (Frontend and Backend) double my hosting costs?
- 9.9 What happens if my server goes down? Does RunCloud fix it?
Who This Architecture Is For
This approach is not aimed at hobby sites or solo blogs. It is designed for teams where developers and content editors have different needs.
If you are working with:
- A marketing or content team that needs editorial autonomy
- Developers who prefer modern JavaScript frameworks
- A product or SaaS site where performance and security matter
Headless WordPress becomes a practical architectural choice rather than an experiment.
Why You Shouldn’t Use Static Site Generators
Many teams migrate to Static Site Generators (SSGs) for faster page load times and simpler hosting requirements, as Markdown files power them. On the surface, the idea sounds utopian as it is “Just a bunch of HTML files! No database! Easy deployment!“
Using a static file-based solution would mean you now need a PR for every update to a blog post. Let’s look at the reality of that workflow in a mid-sized company:
- A marketing manager spots a typo in a blog post.
- They can’t fix it. They have to ask a developer. The developer must create a branch, fix the typo, commit, push, open a Pull Request (PR), wait for the CI/CD, and then merge.
- Your highly paid engineers are spending time fixing typos instead of shipping product.
We cannot expect marketing teams to learn Git or write perfectly formatted Markdown. We need to empower them with a CMS while retaining our own developer freedom.
Classic vs. Headless WordPress
For advanced development teams, the biggest friction point with WordPress isn’t the dashboard; it’s the templating engine.
You might already have a sophisticated corporate identity, a component library built in React, or a legacy styling setup that your team loves. Trying to shoehorn that existing frontend architecture into the standard WordPress PHP template hierarchy (single.php, header.php, the Loop) can feel like forcing a square peg into a round hole.
You often end up fighting the CMS rather than leveraging it, translating modern frontend patterns into WordPress-specific PHP themes. This adds complexity, slows iteration, and ties your frontend decisions to the WordPress render cycle.
This is where the distinction between Classic and Headless WordPress changes the game.
The Classic WordPress
In the Classic WordPress model, the backend (admin interface/database) and the frontend (what the user sees) are tightly coupled. They live on the same server and share the same codebase. When a user visits your site, WordPress dynamically generates the HTML based on your active theme.
For many projects, this is fine (even preferred). But for a technical team that wants to iterate on the frontend independently of the content engine, this monolithic structure can be a bottleneck.
Developers often try to add their modern components within a custom PHP theme or build complex custom plugins to manage data, aiming to make the WordPress editor feel more like a modern frontend experience.
While this can offer temporary relief, it often leads to a more complex, heavier application. You are still ultimately constrained by the limitations of the WordPress render cycle and the PHP environment, and you’re forced to maintain a custom codebase that may be difficult for new developers to onboard to.
The Headless Revolution
Headless WordPress decouples this relationship entirely. Think of it as performing surgery: you keep the “Body” (the robust content management, user roles, and database) because WordPress does that better than almost anyone else. However, you sever the “Head” (the frontend display layer).
In this architecture, WordPress becomes a data source. It sits quietly in the background, waiting for instructions. You then use the WordPress REST API or WPGraphQL to fetch that content and inject it into a completely separate frontend application.
This shift from “Website Builder” to “Content API” unlocks three massive advantages for technical teams:
- You are no longer bound by PHP. You can build your frontend in React, Vue, Svelte, Angular, Next.js, Gatsby, or even plain HTML/JS. If your team is already proficient in React, they can build the site using the tools they know and love, simply treating WordPress as a JSON endpoint. You stop hacking themes and start building applications.
- In a classic setup, your content is trapped in the website’s HTML. In a headless setup, your content is portable data. You can publish a case study once in WordPress and have it instantly available via API to your marketing website, your native iOS/Android app, an internal intranet dashboard, and even a smartwatch interface simultaneously.
- Because your frontend is physically separated from your backend (often hosted on entirely different servers or CDNs), your database is not directly exposed to user traffic. Even if your frontend site experiences a large traffic spike or an attack, your WordPress installation is far less exposed, since it is not directly serving public traffic and can be further protected behind the API layer.
If you want to combine the SEO benefits of static sites with the dynamic power of a CMS, pairing WordPress with a framework like Gatsby is a good choice.
Gatsby pulls your data from WordPress via GraphQL, generates static HTML at build time, and deploys it to the edge. This results in extremely fast page loads that are difficult for traditional PHP-rendered sites to match at scale. If you want to learn more about this architecture, then we recommend reading why Gatsby chose headless WordPress for its blog.
How To Set Up Headless WordPress with Gatsby
For this guide, we will use RunCloud to manage our infrastructure. RunCloud offers an excellent balance of server control and ease of use. While a production workflow usually involves local development pushed to a Git repository with CI/CD pipelines (Atomic Deployment), we will perform this setup directly on the server to demonstrate the architecture clearly.
Here is how you connect the dots between your WordPress backend and your Gatsby frontend.
Step 1: Set Up the WordPress Backend (The “Body”)
First, we need the source of truth for your content.
- Create the App: Log in to your RunCloud dashboard and create a new Web Application. This will host your WordPress installation.
- Install WordPress: Use the RunCloud “One-Click Install” feature (or your preferred installation method) to get WordPress running.
Important Note: For this WordPress Backend step, do not use your final, public-facing domain (e.g., www.example.com). Use a subdomain dedicated to the backend, such as backend.example.com or internal.example.com. Your final domain will be assigned to the Gatsby Frontend application in Step 2.
- Configure Permalinks: This is a crucial step! Go to Settings > Permalinks in your WordPress dashboard. Set it to “Post name” or a custom structure. The default “Plain” setting (?p=123) can sometimes cause issues with GraphQL routing.
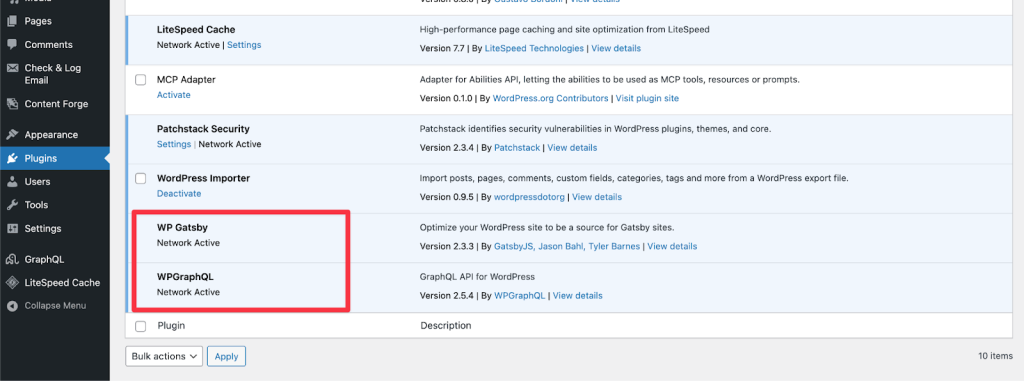
- Install Essential Plugins: Go to Plugins > Add New and install the following two plugins:
- WPGraphQL: This exposes your WordPress data via a GraphQL API.
- WPGatsby: This optimizes communication between WordPress and Gatsby, handling tasks such as cache invalidation and delta updates.
Your marketing team will log in here to publish content. To them, it appears to be a standard WordPress site.
Step 2: Prepare the Frontend Environment
Now, we need a place for the Gatsby application to live.
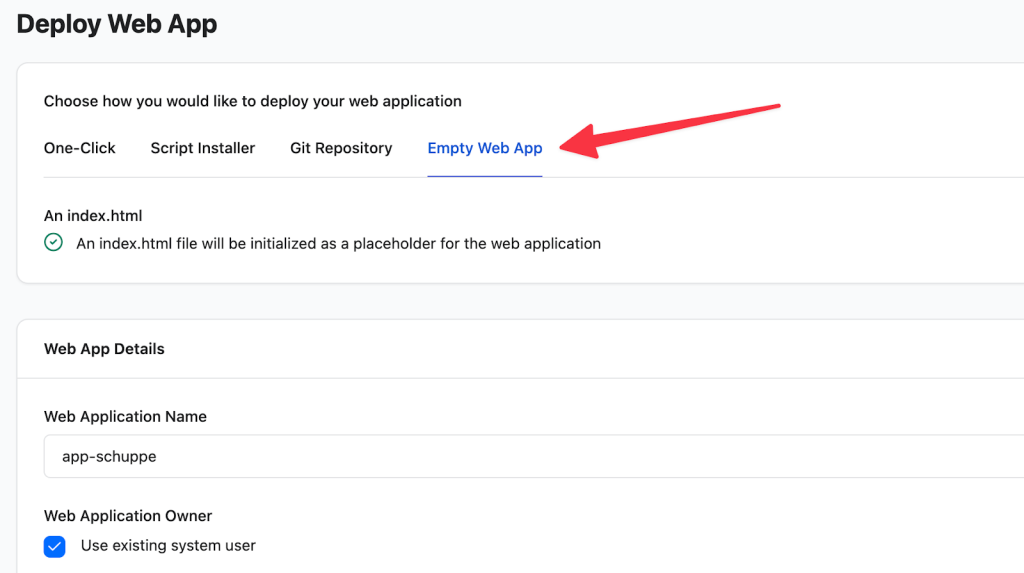
- Create a New Web App: Back in RunCloud, create a second Web Application.
- Select Stack: Choose an Empty Web App stack (since Gatsby is a React-based framework running on Node).
- Domain: Assign your public-facing domain to this application (e.g., www.example.com).
In a production environment, you would develop locally, push to Git, and use RunCloud’s Git deployment feature. For this tutorial, we will initialize the app directly on the server to give you an immediate overview of the file structure.
Step 3: Install Gatsby via SSH
Connect to your server via SSH using the system user attached to your Frontend Web Application. Before moving ahead, ensure the Gatsby CLI is installed globally on the server by running the following command:
npm install -g gatsby-cliNavigate to the root directory of your new application (/home/username/webapps/appname). In this folder, you will need to delete the default index.html file by running the following command.
rm index.htmlOnce the directory is empty, run the following command to generate the site skeleton using a WordPress-specific starter:
gatsby new . https://github.com/gatsbyjs/gatsby-starter-wordpress-blog This command pulls down a pre-configured Gatsby site optimized for fetching data from WordPress.
You have now initialized the core files for your Gatsby frontend in this folder. You can update the React components, styling, and general structure as you like.
Step 4: Connect Frontend to Backend
You need to tell Gatsby where your WordPress API lives. Open the configuration file using your preferred editor (nano or vim):
nano gatsby-config.jsLocate the configuration options for gatsby-source-wordpress and update the url setting to point to your backend’s GraphQL endpoint. After editing, it will look like this:
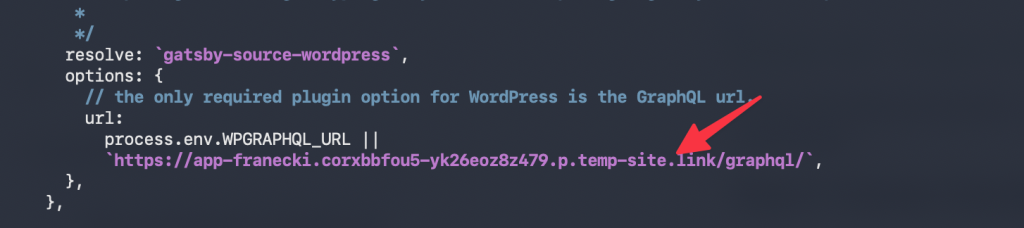
Save and exit the file by pressing Ctrl + O, Enter, and Ctrl + X.
For a deep dive into advanced configuration, schema customization, and troubleshooting, we highly recommend reading the official documentation: Gatsby Source WordPress Documentation
Step 5: Build and Deploy
Now, we will need to generate the static files that will be displayed on the internet.
Handle SSL (Optional): If your backend is on a staging server using a self-signed certificate, Gatsby might refuse to connect. You can bypass this temporarily by running:
export NODE_TLS_REJECT_UNAUTHORIZED=0Build the Site: Run the build commands to fetch the data from WordPress and generate the HTML/CSS/JS files in your Gatsby environment:
gatsby clean
gatsby build
Update Public Path: By default, RunCloud points the web server to the root of your application. However, Gatsby compiles your static site into a folder named “public”. Therefore, we will update the public path of the Gatsby web application in the RunCloud dashboard. Please note that we don’t need to modify this setting for the WordPress backend.

- Go to your RunCloud Dashboard > Web Application > Settings.
- Change the Public Path to /public.
- Save settings by clicking the Update Stack button.
After updating the public path, your website will be immediately accessible on the internet.
Suggested Read: What is WordPress Object Caching
Next Steps and Considerations
With your Headless WordPress architecture now fully deployed, here are a few things to consider for ongoing maintenance and optimization:
Continuous Deployment for Content Changes
Currently, every time your marketing team publishes a new post or makes an edit in the WordPress dashboard (Step 1), you still need to manually run gatsby build on your server (Step 5) to see the changes on the live site. To automate this process, you need to implement Webhooks and CI/CD.
- Configure Webhooks: The WPGatsby plugin you installed in Step 1 can be configured to automatically send a signal (a webhook) to an external service every time content is saved or published.
- Trigger a Build: Set up your deployment pipeline (e.g., using RunCloud’s Git deployment feature or a dedicated service like Netlify/Vercel) to listen for this webhook. When the signal is received, the pipeline automatically triggers a new Gatsby build, fetching only the updated content (delta changes) and deploying the new static files.
- Benefit: This creates a zero-touch content workflow, where the content team publishes content, and the live site updates automatically in minutes, without requiring developer intervention.
Scaling and Optimization
Since your frontend is static, hosting it on a global Content Delivery Network (CDN) will drastically reduce load times for international users. Services like Cloudflare or AWS CloudFront can be easily configured to sit in front of your Gatsby application.
Maintaining Security
The separation of your backend and frontend inherently improves security, but proactive measures are still essential for the WordPress installation:
- Regular Updates: Ensure your WordPress core, themes (even those unused for templating), and all plugins (especially WPGraphQL and WPGatsby) are kept up to date. We strongly recommend using Patchstack for this step, as it secures your website from vulnerabilities by using RapidMitigate technology, which protects your website even if the plugin developers haven’t released an update.
- Firewall Rules: Use the firewall features to restrict access to the WordPress dashboard (e.g., only allow specific IP addresses or VPN ranges) since it’s an internal-only application.
This decentralized approach gives you the ultimate control to tune and scale each component independently, ensuring both performance and editorial freedom.
WordPress is a Power-Up, Not a Compromise
For too long, developers have viewed WordPress as a “necessary evil”, something you tolerate because the client demanded it. It’s time to retire that mindset.
When you pair WordPress with a modern architecture, such as a Headless setup, it stops being a compromise and becomes a massive workflow accelerator. It solves the content problem instantly, allowing your team to focus on what actually moves the needle: building high-performance user interfaces, optimizing conversion funnels, and shipping code.
You get the stability of a CMS that powers over 60% of the web, combined with the bleeding-edge speed of a React frontend.
You Don’t Need to Be a Linux Expert
Perhaps the biggest hesitation remaining is the infrastructure. “If I go Headless, don’t I need to manage multiple servers? Do I need to be a Linux sysadmin to keep this secure?”
This is where RunCloud bridges the gap.
Powerful architecture shouldn’t require you to spend your time managing low-level server configuration. RunCloud does all the heavy lifting for you. We automate the provisioning, security patching, and server management so you can deploy a WordPress backend and a Node.js frontend in minutes, not days.
But unlike “Managed Hosting” that locks you in a black box, RunCloud respects your expertise.
- We handle the tedious tasks: SSL installation, backups, and service monitoring occur automatically.
- You retain control: You maintain full root access to your server. Want to tweak a custom NGINX config? Go ahead. Need to install a specific server-side library? You have the keys.
You get the convenience of a managed dashboard with the raw power of a VPS.
Ready to Build Your Headless Stack?
Don’t let infrastructure headaches stop you from building the best version of your website. Join developers and agencies using RunCloud to deploy faster, secure their infrastructure, and scale with confidence.
Sign up for RunCloud today and start building your next project with the freedom you deserve.
Frequently Asked Questions
Is Headless WordPress too complex for a small development team?
While the initial setup requires more architecture than a standard install, it often simplifies long-term maintenance by separating the frontend code from the content database. This separation enables your developers to work with modern frameworks, such as React, without compromising the content editing experience for the marketing team.
Does using a Headless architecture hurt my SEO rankings?
On the contrary, a Headless setup often improves SEO by using Static Site Generation (SSG) via tools like Gatsby or Next.js. These frameworks generate pre-rendered HTML that loads instantly and achieves high Core Web Vitals scores, which are a major ranking factor for Google.
Do I need to be a Linux system administrator to use RunCloud?
No, RunCloud is designed to eliminate the need for command-line expertise by providing a visual dashboard for server management. We handle the heavy lifting (such as configuring NGINX, firewalls, and SSL certificates) so you can focus on your application, while still providing root access if you ever need it.
Why use RunCloud instead of traditional “Managed WordPress” hosting?
Traditional managed hosting often locks you into a “black box” environment where you cannot change server configurations or install custom software. RunCloud offers the best of both worlds: the automated convenience of managed hosting, combined with the flexibility and cost-effectiveness of owning your own VPS infrastructure.
Will my existing WordPress plugins be compatible with a Headless setup?
Backend plugins that manage structured data, such as Advanced Custom Fields (ACF), work well by exposing their data via the API. SEO plugins, such as Yoast, can still be used as data sources but require explicit integration in the frontend to render metadata correctly. However, frontend-specific plugins, such as visual page builders or sliders, will not work, as you are replacing the WordPress theme layer with your own custom frontend code.
Is WordPress secure enough to be used as an enterprise backend?
WordPress is highly secure when maintained correctly, and a Headless architecture makes it even more secure by decoupling the database from the user-facing site. Since the frontend consists of static files or a separate Node.js app, your actual WordPress database remains hidden from direct public traffic and potential attacks.
Why not just use a pure file-based CMS instead of WordPress?
File-based systems (using Markdown) often struggle to scale when multiple non-technical users need to edit content simultaneously. WordPress provides a robust, multi-user database with granular permissions and a user-friendly interface that file-based systems simply cannot match for team collaboration.
Does running two separate applications (Frontend and Backend) double my hosting costs?
Not necessarily, because the WordPress backend in a Headless setup requires fewer resources since it isn’t serving public traffic. Furthermore, using RunCloud allows you to host multiple web applications (both your WordPress backend and Node.js frontend) on a single server, keeping your infrastructure costs efficient.
What happens if my server goes down? Does RunCloud fix it?
RunCloud provides tools to monitor your server’s health and automatically restart services (such as NGINX or PHP) if they crash. While we manage the software layer and configuration to prevent downtime, you retain full control and ownership of your relationship with your cloud infrastructure provider (like AWS, UpCloud, or DigitalOcean).